
How to Display Google Reviews on Your Restaurant Website
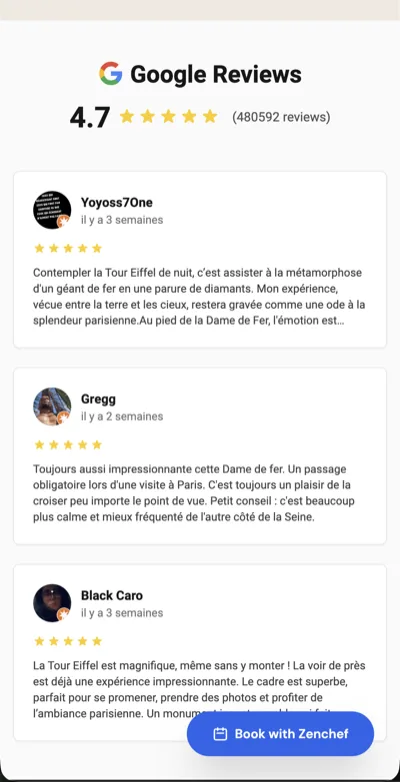
Showing your Google Reviews directly on your site lets visitors see social proof without leaving the page. A customer who sees “4.7★ — 89 reviews” right on your website is more likely to make a reservation than one who has to go find that information on Google Maps. You remove friction and build credibility.
Why It Matters
Most diners read reviews before choosing a restaurant. If those reviews aren’t visible on your site, you create an unnecessary detour: the customer leaves your page, searches for your restaurant on Google Maps, reads the reviews, and comes back — if they come back at all.
Reviews on your site also have a secondary benefit: they contain natural keywords (“amazing burgers,” “great outdoor patio”) that strengthen your local SEO.
The 3 Methods to Display Google Reviews
Method 1: Third-Party Widget (Elfsight, Taggbox…)
This method assumes you already have an existing site (WordPress, Wix, Squarespace, or similar). If you don’t, start by creating your restaurant website before installing anything.
Once your site is in place, you sign up for an external service, enter your Google Place ID, and paste a script into your site.
Pro: Compatible with all existing CMS platforms. Con: €9–€25/month on top of your hosting and CMS subscription. The widget loads external JavaScript that can slow down your page.
Method 2: Custom Code via the Google Places API
A developer integrates the Google API directly into your site. Reviews are fetched and cached server-side.
Pro: Custom solution, full design control, no third-party dependency. Google’s monthly free credit is more than enough for a single restaurant. Con: Requires a developer (€300–€800 in fees) and ongoing maintenance as the API evolves.
Method 3: Resto1.Click Pro
In the dashboard, under “Google Reviews,” you enable the display and paste your Google Place ID. Reviews appear on your site with automatic 24-hour caching — no external JavaScript, design integrated with your template.
Pro: 30-second setup, zero technical skills. Con: Available only on the Pro plan (€29/month or €24/month billed annually).
Comparison
| Criteria | Third-party widget | Custom code | Resto1.Click Pro |
|---|---|---|---|
| Price | €9–€25/month | Free (API) + dev | Included in Pro plan |
| Setup | 30–60 min | 3–5 hours (developer) | 30 seconds |
| Performance | External JS (slower) | Optimizable | Optimized (no third-party JS) |
| Maintenance | None | You manage it | None |
Setting Up Google Reviews with Resto1.Click Pro
Step 1: Find your Google Place ID (2 min)
The Place ID is the unique identifier for your restaurant on Google Maps.
- Go to the Google Place ID Finder
- Search for your restaurant in the search bar
- Select your establishment
- Copy the Place ID displayed (starts with “ChIJ…”)
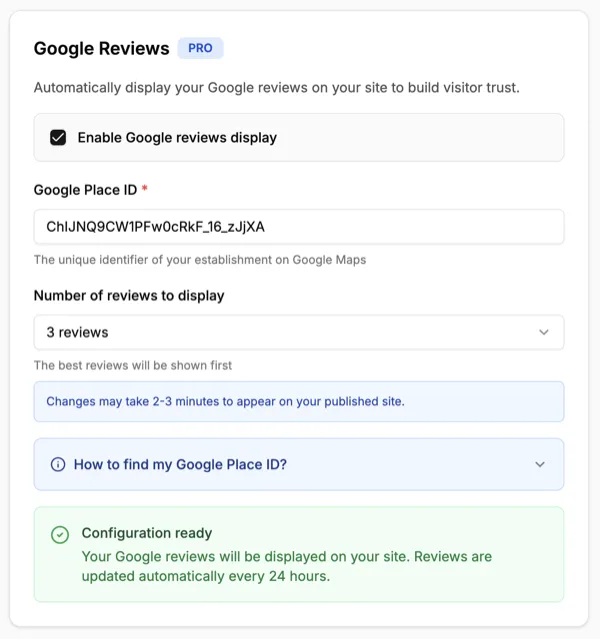
Step 2: Enable the display (30 sec)
- In the Resto1.Click dashboard, go to “Google Reviews”
- Toggle on “Show Google Reviews”
- Paste your Google Place ID
- Choose how many reviews to display
- Save
Your reviews appear on your site within 2–3 minutes. New reviews are pulled in automatically (24-hour cache refresh).
How to Get More Google Reviews
Displaying reviews is good. Having enough of them is better.
The 3-step process:
1. Create your review link In Google Business Profile > “Get more reviews.” You get a short link that goes directly to your restaurant’s review page.
2. Generate a QR code Use a free online tool to create a QR code pointing to that link. Print it on table tent cards (€10–€20 for 20 laminated cards), at the bottom of the check, or near the exit.
3. Brief your staff At the end of the meal, your server can simply say: “If you had a great time, we’d really appreciate a Google review — just scan this code.” A genuine ask is all it takes.
Google’s rules: Never offer a discount in exchange for a review. Don’t only ask happy customers. Never write fake reviews — Google detects them and penalizes your listing.
Respond to every review, positive or negative, within 24 hours. It’s a trust signal for Google and for future customers who read your responses before deciding.
Template for positive reviews:
“Thank you [Name]! So glad you enjoyed [specific detail]. Hope to see you again soon. — [Your name]”
Template for negative reviews:
“Hi [Name], thank you for your feedback. We’re sorry [issue] didn’t meet your expectations. [Corrective action]. Feel free to reach us directly at [phone]. — [Your name]“
FAQ
Can I choose which reviews to display (hide the negative ones)? No — Google doesn’t allow it. You either show reviews as they are, or you don’t show them at all. Resto1.Click automatically selects the best ones by rating and recency from those returned by the API.
How many reviews do I need before enabling the display? A minimum of 5–10 for the section to look credible. Below that, you may prefer to wait until you have more.
Does this help my Google ranking? Indirectly. Reviews contain natural keywords, visitors spend more time on the site, and the bounce rate drops — three positive signals for Google.
What if I have no reviews yet? Start by setting up the QR code and briefing your staff (see above). A realistic goal: 10 reviews in 30 days for an active restaurant. Enable the display once you have enough.
Display your Google Reviews with Resto1.Click Pro.
→ Start your 14-day free trial
✓ 30-second setup (just paste your Place ID) ✓ Automatic 24-hour refresh ✓ Design integrated with your site ✓ 14-day Pro trial included